Summary
- Before attempting to use ORA, you must purchase a license.
- Install the OraHost program
For detailed instructions, see the Installation Instructions. Summary:
- Download the OraHost installer
Run the installer after you download it. Your browser may warn you that it is not "commonly downloaded".
- The installer will automatically launch the OraRegister program.
Have your license information ready.
- Download the OraHost installer
- Install OraExtension.
For detailed instructions, see the Installation Instructions.
- Visit one of the supported repositories.
Components
ORA includes the following components:
-
OraExtension
This is a browser extension that creates the OraPanel, adds status icons to links, and makes other changes to pages on repository sites you visit. It also creates the OraSettings page.
-
OraHost
This is a program the browser starts when you open the browser. It does not have a main window and is usually not visible. It provides services to OraExtension. This includes sending text to other programs as part of the Auto Type feature, and exporting and importing settings. When importing and exporting, OraHost is briefly visible via its OraPrompt subcomponent when it shows Open File and Save File dialog windows.
OraHost includes two subcomponents, OraRegister and OraPrompt.
OraRegister runs after you install OraHost. It registers the software. This includes storing your license information and configuring your system so that browsers can find OraHost.
OraHost starts OraPrompt when OraHost needs information from you, such as the name of a file on your PC. OraHost is a background application that is started by your browser and it cannot open any windows directly. It uses OraPrompt to interact with you when the information it needs is not provided via OraExtension.
OraPanel
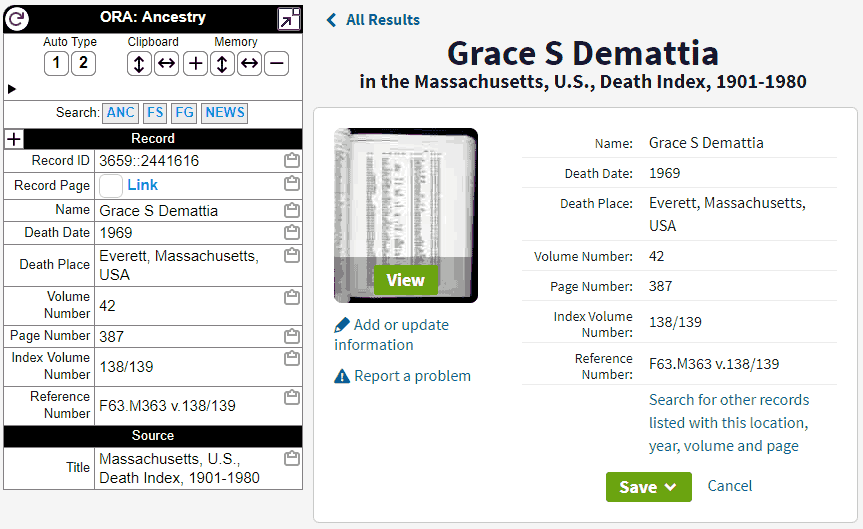
- ORA extracts record data from the current page and creates a row with a label and value for each Field it finds.
- Date values are converted to your preferred format where the choices reflect standard genealogical practices.
- Some labels are converted to standard values to simplify template creation. For example, if a record page includes a Field named "Birth" or "Born" and the Field value is a date only, the Field label is converted to "Birth Date". Standardizing labels helps when comparing fields from different collections.
- You may add Field values to the OraPanel by defining one or more Text Templates. Templates are evaluated when ORA adds the OraPanel to the page and when you press the Refresh icon.
- You may edit a Field value to correct errors by clicking on the Field value while holding the Alt key. For example, you may correct a transcription error prior to using an Auto Type Template that uses the Field value to update your genealogy project.
See the Introduction to ORA slideshow for more information about using the OraPanel.
Refresh
The icon in the upper-left will refresh the OraPanel. If the page contents change and ORA does not detect it, you an use the refresh icon to force ORA to reprocess the page.
Some pages load content after the page is initially displayed. When using the Generic Service for web pages that are not part of a supported repository, you may have to press the Refresh icon to trigger ORA to update the OraPanel and load data that was added to the page after ORA created the initial version of the OraPanel.
Repository Help
The title bar of the OraPanel includes a link to the ORA help page for the current repository. The help page includes repository-specific information that will help you use ORA effectively with that repository.
Moving the OraPanel
To move the OraPanel, click on its title bar, hold the mouse button down, and drag the OraPanel to a new location. Do not click on the icons or the link to the current repository.
Expand-Collapse
The icon in the upper-right will expand or collapse the OraPanel. Clicking the icon toggles between collapsing the OraPanel to show only its title bar and expanding the OraPanel to show its full contents.
Auto-Type
The numbered buttons in the Auto Type section near the top of the OraPanel initiate data transfer to your genealogy application. See the Auto Type help page for more information.
Clipboard
The Clipboard controls copy the current record's fields to the clipboard.
| Copy the current record to the clipboard. Each Field gets a row with two cells, label and value. | |
| Copy the current record to the clipboard. Each Field gets a column with two cells, label and value. |
If you hold the Alt key when clicking either of those buttons, ORA will include hidden fields in the data copied to the clipboard. The hidden fields are usually not useful for analysis. ORA creates the Fields for possible use with the Auto Type feature.
When copied to the clipboard text, cell values are separated by the Horizontal Tab character.
See the article How To: Configure Excel for Clipboard and Memory Copy for helpful advice about pasting text into Excel.
Memory
With the Memory controls, you can copy the fields from multiple records and then paste them with one paste command. ORA uses the Field labels to align data in rows and columns.
| Add a record to memory. Each record you add will be included in the set copied by one of the Memory copy buttons. | |
| Copy all the records in memory to the clipboard. Each record gets a column, and each Field value gets a row. | |
| Copy all the records in memory to the clipboard. Each record gets a row, and each Field value gets a column. | |
| Clears all records from memory. |
When copied to the clipboard text, cell values are separated by the Horizontal Tab character.
See the article How To: Configure Excel for Clipboard and Memory Copy for helpful advice about pasting text into Excel.
Show Auto Type Legend Arrow
The arrow under the Auto Type buttons opens the "Auto Type Legend", a list of the Auto Type reminders for the Auto Type buttons present in the current collection. The arrow only appears when there are one or more Auto Type Templates defined for the collection and Show Auto Type Legend option is checked on the OraSettings page.
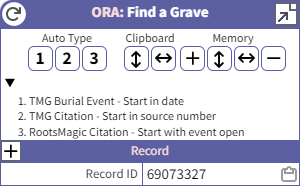
After clicking the arrow, ORA shows the reminders for your Auto Type Templates.
Add Field
The icon in the left of the "Record" subtitle row will add a Field to the OraPanel.
When you click the Add Field button, ORA will prompt you for the name of the new Field, and then it will prompt you for the value of the new Field.
You may not include a colon (":") in the name. If you include a colon in the name, ORA will use the text before the colon as the name and the text after the colon as the value. This is a way to enter both the name and the value in response to a single prompt.
The new Field will appear at the top or the bottom of the OraPanel as determined by the Add Fields at Top option.
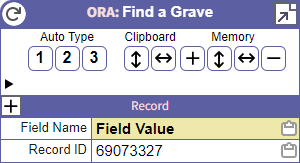
For example, if you add a Field with the name "Field Name" and the value "Field Value", and the Add Fields at Top option is checked, the new Field will appear at the top of the OraPanel.
As shown in the screenshot, ORA will apply the User Field Styles to the new row.
The new Field will persist through a OraPanel refresh, but will not persist if you refresh the page using a browser menu entry or command key.
Some web pages refresh the page in response to actions that would not typically cause navigation, such as selecting an item from a pull-down menu.
Another option for creating persistent values is to use the double-equal Assignment reference.
Fields
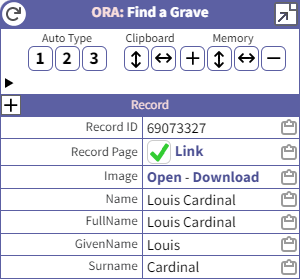
The OraPanel includes multiple fields that ORA creates by extracting data from the page. For each Field, the Field name is in the left-hand column and the Field value is in the right-hand column.
The screenshot includes several fields. Fields vary by repository, collection, and other factors. The fields shown here are only an example.
Field names are taken from the data items extracted from the current page. ORA removes characters that are not valid in template variable references. ORA also does some name standardization to help when comparing fields from different collections.
Edit Field
You may edit a Field value to correct errors by clicking on the Field value while holding the Alt key.
Copy Field Value
The value column includes a clipboard icon you can click to copy the Field value to the clipboard.
Long Field Values
If a Field has a long value, ORA puts the Field name in a single-column row followed by the Field value in another single-column row. This saves vertical space which is helpful when a record has a lot of fields.
Record Status
ORA helps you stay organized when reviewing search results. Using the Record Status feature, you assign a status to any record you have processed or intend to process. ORA supports these record status values: Unassigned, Accepted / Entered, Pending, Questionable, and Rejected.
After assigning status to some records, your search results will include icons to indicate the status values you assigned:
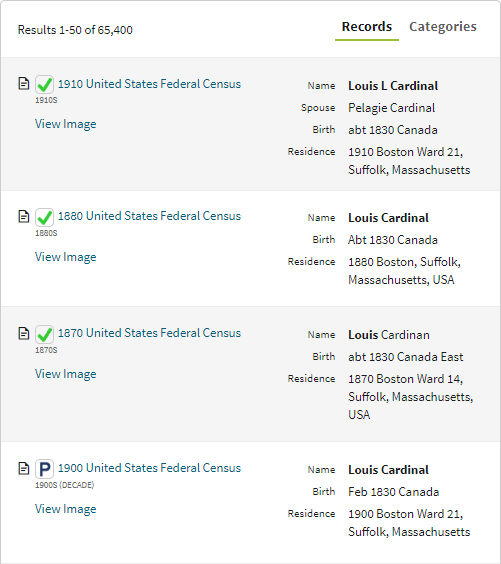
You do not have to assign a status to every record you see, and you shouldn't. When its obvious that a record does not apply to your research, ignore the record. However, when reviewing search results and processing records:
- If you process a record and use it to update a record in your database, assign the Accepted / Entered status, represented by a checkmark.
- If you see a record that you believe applies to your research, but you decide not to process it, assign the Skipped status, represented by an "S".
- If you see a record that might apply to your research, but you do not want to investigate the record or person at that moment, assign the Questionable / Might Apply status, represented by a question mark.
- If you see a record that applies to your research, but you do not want to process it at that moment, assign the Pending status, represented by a "P".
- If you see a record that does not apply to your research, but appears promising enough that you may be fooled into re-investigating the record in the future, assign the Rejected status, represented by the "No" symbol.
You can use the [Show Pending Records] and [Show Questionable Records] buttons on the OraSettings page to open a list of those records and quickly return to one of them to resume your processing or deliberation.
You may to choose to assign a different meaning to one or more of the Record Status icons. The key is to use the icons consistently.
OraSettings
See the OraSettings help page.